This past week was a bit lighter on new additions. This was mostly from catching up on tasks related to adulting, as well as the power outage on Tuesday afternoon due to the ice storm. Nevertheless here’s what’s new:
Forest and Swamp Updates
Two Saturday’s ago we had a team meeting, discussing updates to the story line, listening to new music, and of course discussing updated game play. One of our discussions was over the current swamp graphics. We decided that it wasn’t “swampy” enough. Below is the updated swamp graphics:
New Vanilla Swamp
We decided to add some more browns and have less greens. Obviously when other assets are on the screen, such as water, trees, etc., the area will feel even more like a swamp. The good news is the time spent on old swamp graphics were not in vain, as we are re-purposing that art to be for the forest area now.
Item Dialog, Collectibles and Chests
The majority of the week was spent on adding items and updating weapons. Currently, the only “items” in the game before this past week was weapons. We needed a mechanism that all items could handle. However, not all items behave like weapons. We needed to insert an Item object at the top of the hierarchy. Now, Items have two children: Weapons and Collectibles. Weapons work the same way as they did before, while Collectibles at the moment are just things the player collects. Ultimately, there will be a purpose to collecting these collectibles. But for now, they don’t have any function. The beauty is now that we have a system in place, it should make adding these functions go very quick.
Collectibles
Since we have our new Item object, we were able to make a Chest object, which can contain treasure (an Item object). If a treasure is a Collectible object, the treasure can have a quantity associated with it. For example, an arrow that is not shot is considered to be a collectible. One might open a chest and find 15 arrows inside. Wahoo!
Chests
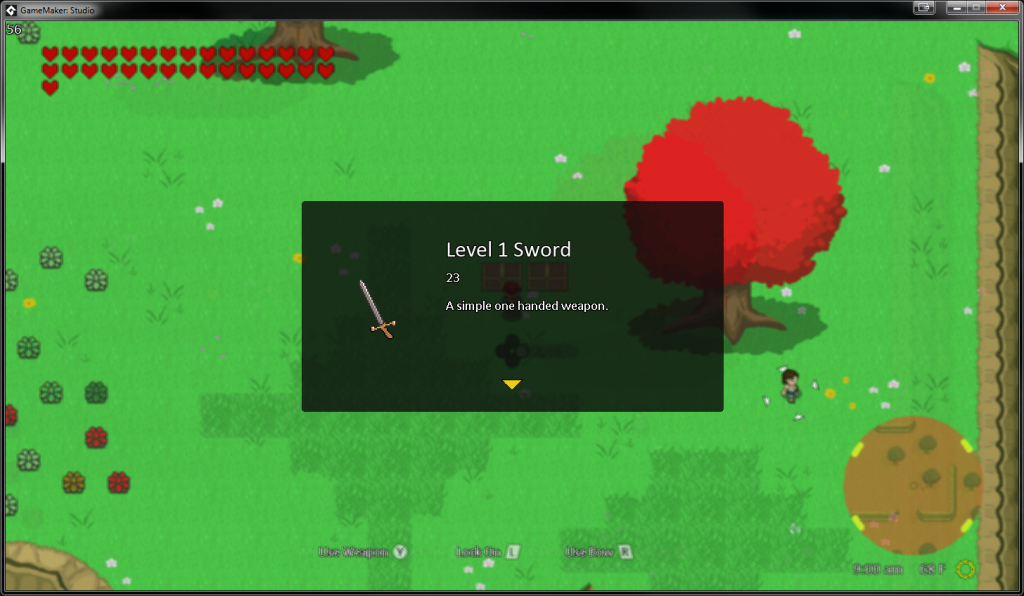
When a chest is opened, a new dialog screen pops up, informing the player the name of the item, the stat (damage for weapons, for example), the description, and a picture. The same dialog screen appears for items being picked up for the first time as well:
First Time Item or Opening Chest
Pause Screen
The last major addition to the game this past week was adding a pause screen. The game actually had a pause screen before, but it was just a placeholder, and was not very functional. Though the new pause screen is not final, it at least is now usable.
Pause Screen
I had the hardest time coming up with an adequate pause screen. This is not because the programming was difficult — rather — trying to come up with a user interface that has a good user experience. I studied Breath of the Wild’s pause screen for quite some time and concluded that pause screen was mostly perfect for what they were trying to accomplish. Here are my reasons:
Items, weapons, materials, etc. are put into their own categories or buckets. These buckets are conveyed in a “mobile-like” tabular approach, where the name of the bucket is shown, as well as the bucket being highlighted (vs the other icons being dimmed). Buckets with multiple “pages” are represented with a little “mobile-like” circle (not implemented currently). This idea makes finding and sorting items and weapons quick and easy.
Content is on the left and descriptions is on the right. Since most languages are read left to right, it also makes sense that the buckets (or selections) are on the left, and what it does is on the right.
The three main top level menus are controlled separately. Currently, only “inventory” is built in the screenshot above, so it hasn’t made sense to build the functionality of the top level menus. But I love the idea that L and R move these top level menus, since they are on the “top” of the controller.
Breath of the Wild’s pause menu is purposely simplistic, and feels like you’re on a mobile device, but the inputs are with a controller instead of gestures. This is something I will continue to try to capture with our menu, and thus continue to iterate with these ideas in mind.
Conclusion
We are a little over halfway done with February. These next couple weeks we hope to wrap up the bulk of the main “system” for the game. From there, we will begin using these assets to start building out the actual game. Stay tuned!
With the ice storm we had last night, much of northwest Ohio and southeast Michigan are without power. I had already planned on writing a post today — but not having electricity gives me more incentive to use my battery sparingly instead of consuming my battery compiling new builds every few minutes.
A year ago today marks the first commit to the original repository “game-idea”.
First Commit
Thinking back, I actually started goofing around in Game Maker back in January of 2018. Once I made a change I wanted to revert back to, I realized it was time to put the prototype into Git. Since I am paying for Github for a few other side projects, this workflow made sense.
In the first post, I mentioned how and why I began this project. But interestingly, I started this idea back in college in my Professional Ethics class (I know, very ethical of me, right?). I wanted to come up with an fun combat system where the enemy (now know as the Soldier type enemy) could be made easy or difficult, given a few parameters, but running the same logic.
Old Old Prototype
In this prototype, you could “swing” your sword around by moving the mouse. The player would use the WASD keys and the player would always face the mouse. If the player was moving in the direction of the mouse, they would move faster, and moving away from the mouse meant the player would walk slower. It was a neat concept, but when I began rebuilding back in January of last year, I knew I wanted to build with a controller input in mind.
There really wasn’t much to show in the month of January 2018 as it was mostly porting the prototype from Game Maker 8 to GMS 1.4. However, once ported, I began hammering out the main movement concepts I wanted to have, as well as nailing down an appropriate controller input system.
The first feature that was built was the slow motion dodge mechanic. Game Maker has a concept of alarms, but they count down as whole integers. To do slow motion correctly, timers and counters need to count in integers, and decimals when in slow motion mode. I ended up making an object called obj_Core to support timers with integers and decimals, which all objects in the game inherit from. It was great building that then because there are a lot of “core” features that all objects need in the game currently that we can simply tack onto obj_Core.
Old Test
From there, it was all about honing in on making smooth, tight controls, as well expanding on the Soldier enemy. Since my main inspiration was The Legend of Zelda: Breath of the Wild, I needed to build in the three main weapon styles — single handed, two handed quick, and two handed slow. With that all working, I began adding a little bit of art to the game. All the startup sprites can be found in this repo. I am so thankful for them, because I would not have been able to make the game initially believable without them.
Old Screenshot
Another interesting thing from the original concepts was the hero was a girl. Even though I had ideas of the game being called “Violet” by this point in time, I knew I did not want the hero to be a girl. The main reason for the hero starting as a girl was because I didn’t want to stare at a guy all day — especially since the sprites I had then were very limited! 😀
By the end of March, I started to really have something that felt good. Keep in mind, the only times available to build were in the evenings and on weekends. Progress was being made, but at a very slow pace.
I was also getting input regularly from friends and co-workers to see what they thought. There was (and is) always three questions I would ask: “What did you like about it?”, “What did you not like about it?”, and “Did you have fun?”. The last one is the most important as if the player was not having fun in the couple minutes they were playing, I knew we would need to start over. Most of the time the answers to the “What did you not like about it?” were a feature not fully being fleshed out, to literally something I was about to add “not there.” Most answers to the “What did you like about it?” were about the same as well — the controls felt good. Hearing that the controls felt good to me meant there was a good foundation to continue building on.
The months of April and May showed a lot of polishing of the controls, as well as adding a few new controls and enemies, such as Shields and Violets. Even with all the new enemies and features, my lack of graphical expertise was really beginning to show. The sprite generator was great, but the “believablity” of the game began to drop as black squares and square boxes became more and more apparent. Around June, one of my friends suggested to talk with Hannah about graphics. Showing her the rough game play and explaining the ideas I had for the game, she decided to come aboard!
Older Screenshot
The “world” at the time was basically a big box with really no where to go. It felt very claustrophobic. In the month of July, we decided to “open the world” up and let people roam free. The world would be 2 / 729 of the actual size of the game, but it was enough to make it “believable” again. Opening the world meant adding some new features, like a day / night cycle, lighting, etc. But it also meant some optimizations were needed. The months of August and September were spent cleaning up, optimizing and polishing newer features.
The rest of the story has been or is currently being told in the blog. It’s been quite an amazing journey so far building this game, and even more amazing to see how all of the pieces have come together. I knew in the months leading up to January of 2018 that something needed to change with my life. Simply coming home from work and vegetating on Netflix couldn’t be all there was to do in life. I’ve always had a passion for gaming so I decided “why not try making one?” I believe anyone’s passion and dreams can become a reality if you work hard enough for it. But it can’t start tomorrow — it has to start today!
Thanks for letting me reminisce on the journey and I hope it was (and still is!) interesting to see and hear!
This past week has been an interesting one as far as what we’ve added. I feel like we were all over the spectrum with what new features were added. Let’s get to it!
R-Stick Targeting
This past week or so we had some people play around with what had implemented. A friend of mine had a suggestion about being able to use the R-Stick for targeting and manipulating the camera. Interestingly, I had tried implementing an R-Stick selection feature many months ago, but did away with it because the algorithm I was using to “select” the target was not always consistent from a game play perspective. However, many new features have been added to the system since then, so I thought we would give it another go.
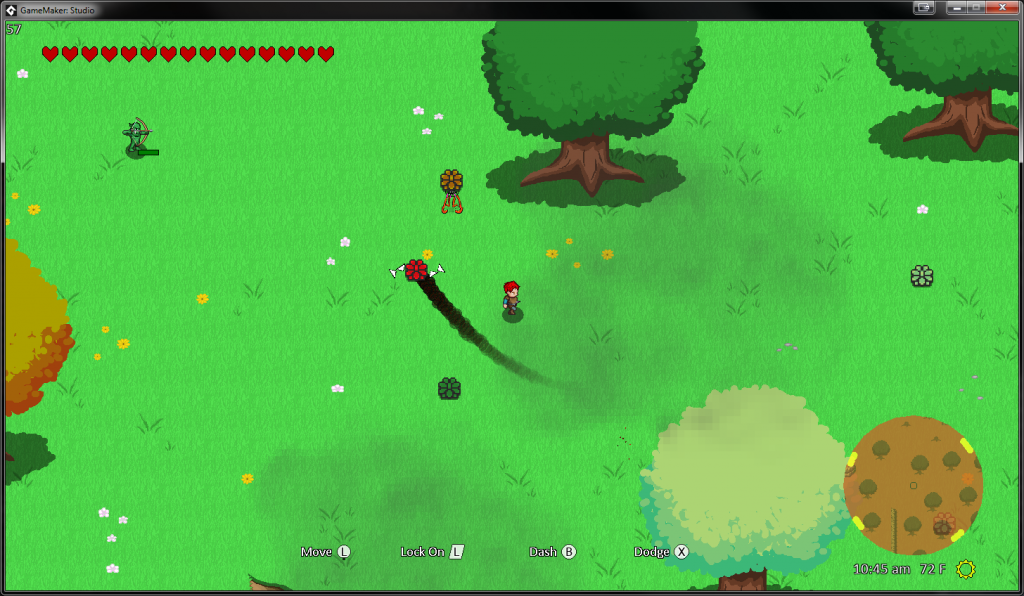
The biggest problem we were trying to solve for was being able to target the enemy in the back who was sniping with arrows. The current method of targeting is to select the closest enemy within reason. If one presses the L Trigger, it will toggle to the next nearest. If we have 3 or more enemies, one of them in the back snipping (as they are programmed to do), it makes it impossible to select these enemies without moving the hero towards the enemy snipping.
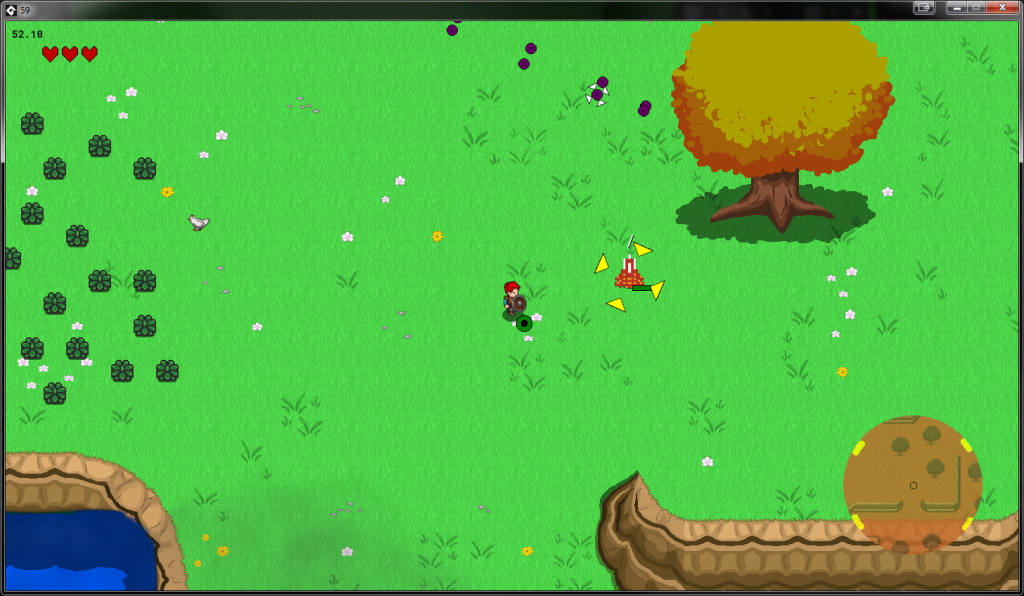
Updated Targeting System
In the picture above, the bigger yellow triangles represent what the player is currently targeting. The smaller white triangles to the left of the current target is the what we would select if we were to press L Trigger again. We can think of this as the “next nearest”. To the south of the current target, and in the upper right of the picture are some even smaller tan triangles. Along with the white triangles, these represent what we would select if we move the R-Stick in a certain direction. For example, if the player were to press the R-Stick in the right or up direction, it would choose the Orc with the bow. If the player were to press the R-Stick down, it would select the Orc with the sword. And finally, if the player were to press the R-Stick in the left direction, it would choose the Minotaur.
The trickiest part of implementing the system was getting the UX down. Originally we thought it would make most sense to color specific directions of the R-Stick. But with so many different colors moving around, plus the “next nearest” concept, it became overwhelming and hard to keep track — especially when colors don’t really represent directions (I even tried googling to see if there was a set standard). Currently we are using the small tan colored triangles, but those might end up going away. We figured the best experience with the R-Stick method of was to make sure it “just works”. If a player can simply know that if they press R-Stick right and it selects the “right” enemy, there is no need to have different color triangles, indicators, etc.
We believe this will work for combat because the player using the R-Stick to select a target is not focused on melee fighting, at that point in time. This is because it is practically impossible to use the R-Stick at the same time as the face buttons (A, B, X, Y), thus making it impossible to fight with melee weapons (since melee weapons are bound to face buttons). Therefore, the player who is using the R-Stick is focused on moving the target and not the combat at that point in time. Colors, indicators, etc. then is not important, as long as selection in a certain direction with the R-Stick “just works”.
R-Stick Camera
My friend’s other suggestion from months ago was to have the ability to move the camera with the R-Stick. My friend is a very stealthy player, and he wanted the ability to know what was coming up so that he can sneak better. I’ve personally am not a stealthy player when it comes to games, but I still want to reward those who are. Thus, we finally got around to building this feature out. When moving the R-Stick when the player is not holding L Trigger for targeting, the player has the ability to move the camera until the hero is on the edge of the screen. When the player releases the R-Stick the camera will “snap back” so the hero remains in the center of the screen.
The nice extra about this feature is there is now an object we’ve created for the camera follows. Before it was always the hero. Now it is just an invisible object, which during the R-Stick movement, gets controlled. You may ask “what is so nice about this?” Well, this gives us the ability to move the object wherever we want. During a cutscene, for example, we can use that same object, give it some inputs where it should be, and walla! We have a camera moving about in a cutscene.
Swamp / Long Grass / Fire Updates
Hannah supplied a few swamp graphics this week. We decided to use the same grass tile, but color it differently. I was okay with this approach as long as we added a lot more “decor” tiles. Below is a screenshot of a “vanilla swamp” area:
Vanilla Swamp
We still didn’t think it looked swampy enough, so we decided to add some long grass that could be laid over top background tiles. I thought this idea could be used not just in the swamp, but in other regions as well. By simply using the Color Palette Swapper, we were able to make this work very easily:
Long Grass
The player can now walk through the long grass. When walking through long grass, speed is much slower. This also applies to enemies, animals, and NPCs as well! Grass can of course be cut down with a melee weapon. The best part though is grass can easily catch on fire! And when I say easily, it was causing a huge forest fire! I ended up reworking the fire spreading algorithm a bit because the frame rate was plummeting. Flames of fire can now “combine” into one other to form a bigger flame. This drops the amount of fire objects on screen, which helps the frame rate. In return, the combining of fire also makes it look less uniformed, and more “fire like”.
Fire!
Audio Controller
The audio controller was the biggest new feature being worked on this past week. I believe music and sound can make a game that much more memorable, if done right. It’s like extra frosting on the cake, if you will. Tyler and I met this past weekend to discuss how we wanted music to work. We concluded that:
We wanted our music to have the ability to change if a certain circumstance were to arise. For example, if an enemy were to approach, we wanted the music to add more rhythm to the current song to make it sound more intense. Another example is we wanted music to play the same melody, but change instruments during a day / night cycle.
We wanted our music to have an introduction, and then for the music to loop after being completed.
We wanted our music to naturally fade out when approaching the next area, and play hard when we reached the next area.
We ended up solving the first problem by having n variations of the same song playing in sync. Then, for each variation, the system can control each volume separately. When it is time for the enemy music to come in, we cross fade between variation 1 and variation 2, giving it the illusion that we’ve added instrument tracks — when in reality we are just playing a different song, that is the same song with different instruments. This works awesome with the day / night cycle, as it will slowly cross fade as day ends and night starts, and vice-versa.
The second problem was tricky, but we ended up solving the problem with a little help from this video. It’s actually from the same author who created the Color Palette Swapper.
TLDR; we essentially have one music file. We note the length of the introduction and note the length of the loop. Then, with our audio file, we add the first two seconds of the loop to the end of the loop as a “buffer”. During game play, if an audio file’s position is greater than the total length (which can be summed by intro length and loop length), we set the music to it’s current position and subtract the loop length. This was a very clever way of looping music on a certain frame rate cycle!
The final problem took the longest to get right. Most games will start a new audio file when entering a new room. However, since our game will only have one room, we needed a way to figure out if we are close to boundaries. Currently, the system supports to methods of fading music out — entering a building, and entering a new section. Both use similar approaches in that we need to figure out if we are close to the edge of the polygon. The closer we get to an edge, the quieter the music becomes, until we cross the boundary. Once we cross the boundary, we play the next song at full volume. If we continue moving, no problem. If the player doesn’t move away from the boundary, and immediately turns back, we cross fade from the current song back to the old song, but at the “distance away from the polygon” volume they are currently standing.
This solution is very hard to explain in writing, so it’s best if you play the game to get a better understanding of what we are talking about. 🙂
Music Samples
I asked Tyler if he was cool if I shared some of the audio he was working on. I meant to post these Sunday. It’s Friday. 😀
Below we will find 30 second snippets of audio we have been working on. These are all working samples and are bound to change. We’ve purposely reduced the quality a little as well as added some white noise in the sample. But it shouldn’t be too distracting. Let us know what you think!
Well, the first month has come and gone. I feel like we’ve made great progress so far. It’s always hard to tell if one is on target when there isn’t really a “deadline”. However, of the ever growing TODO list, half of the items are crossed off. My goal was to spend the first two months building out enough of the system to the spend the last month making a game prototype. If the list is half complete, and we wanted to be done with the list by the end of the second month, I would say we are on track. Of course, the list is ever growing, and it’s programming, so anything can happen. 🙂
Displaying Hearts Lost When Damaged
One of the reoccurring issues we continue to hear was not knowing how much health was left when in battle. At first this made sense because we didn’t have a “flash to red” color, signaling when the player was taking damage. Once this was implemented, I thought the issue would be resolved. Alas, there were still some feedback. After having a conversation with a friend who was playing the game, I came to the realization as to why this was still a lingering issue.
First, I did some more thinking as to why this wasn’t necessarily a problem in older 2D Zelda games, as well as the 3D games. For one, the 2D games had a resolution of 256×224. With such a small resolution scaled up onto a TV, those hearts were always right within eyes view. Newer 3D Zelda games of course have much higher resolutions. Why do they work? I think it has to do with the 3D perspective. Since what we are looking at when playing those games “has depth”, our eyes aren’t necessarily fixed onto one part of the screen. Thus, we still are subconsciously able to see the health meter (hearts).
Of course, there are other factors at play — such as larger icons, longer iframes, better animations to indicate when hit (we’ll be updating our animations when we polish 🙂 ), etc. But the above was a conclusion I came to when trying to understand why older and newer games did not suffer this problem.
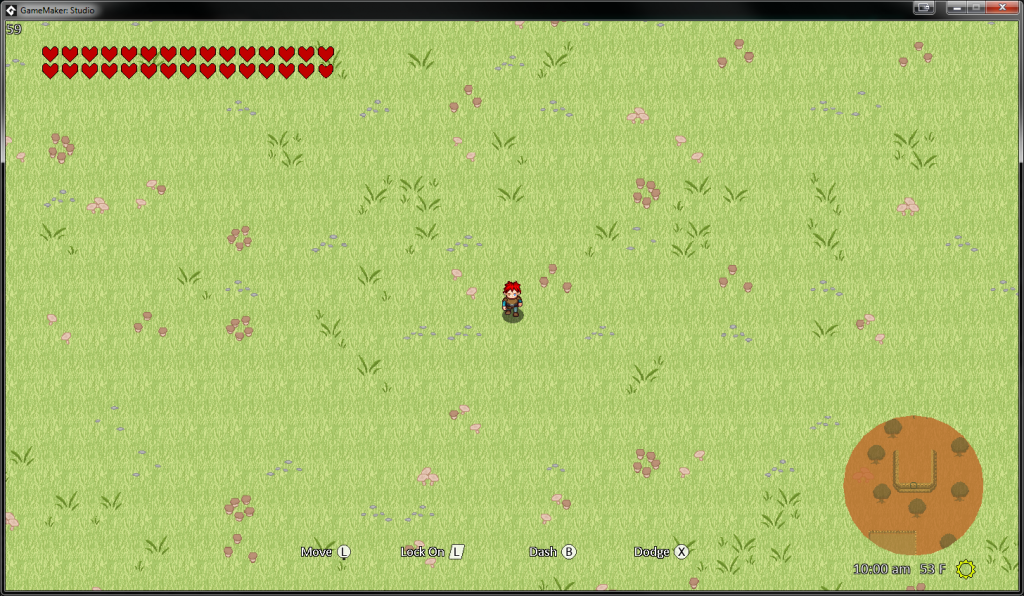
The life meter is represented by hearts in the upper left hand of the screen in the game. Essentially, each heart represents 20 units of health. If the player takes 5 units of damage, a quarter of a heart will display white. If the player takes 10 units of damage, half of the heart will display white. After taking a full 20 damage, the heart will be completely white, indicating the player lost the heart. Rinse and repeat this process until all hearts are white, equaling no health.
One of the distinguishing factors of a “Zelda” game is the health being represented by hearts. In our conversation, there were a few ideas tossed around. One for example, was to move to a health bar underneath the player, like the enemies currently. Since hearts need to represent health, this was non-negotiable.
Another idea came in the form where the hearts could be represented underneath the player. Essentially, a heart would be placed like the health bar, with the number of hearts currently remaining. Though I felt this UI would be too much “take-in” during battle, it sparked an idea. “What if when taking damage, the number of hearts lost came out of the player?” In fact, The Legend of Zelda, Skyward Sword did something similar I believe.
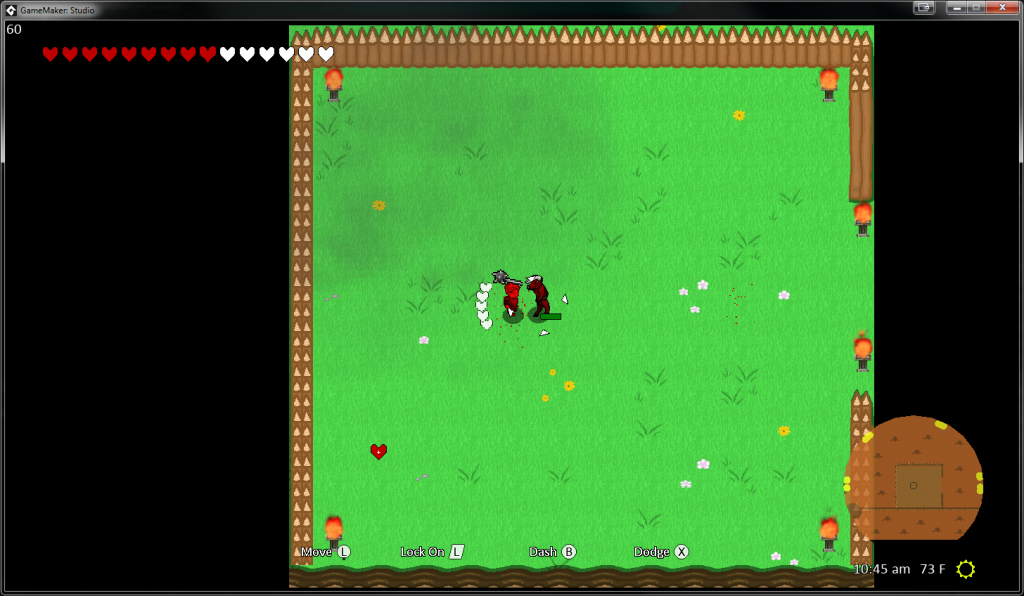
Lost Hearts
As we can see in the screenshot above, the particular attack just lost five hearts of damage. We only display the “full” hearts that were lost in the attack. What this does for the player is now they feel it necessary to take their eyes off the battle scene for a few milliseconds to see how much health they have remaining. That way, they can decide whether to battle on, play it safe, or run away.
Button Mapping Support
There is not much to say here, other than we finally got around to adding button mapping support. Those who prefer the button layout of the Xbox and Playstation will feel right at home when playing this game. There isn’t an elaborate UI for this yet. There are currently two themes to choose from: Classic or Modern. Classic feels like the old SNES and Nintendo layouts, while Modern feels more like the current button mapping of what Xbox and Playstation games do. If the “theme” idea works, we of course will add other play style themes as well. Perhaps in the game, we’ll let the player create their own too.
On Screen Tutorial
Another polish item we got around to this week was an on screen tutorial system. The first type can actually be seen in the “Lost Hearts” screenshot. This type, which I am calling Bottom Tutorial, can show a button label as well as a button icon. This is helpful for the beginning of the game when learning the controls, as well as other actions the player can perform.
The next type is called Action Tutorial. This will show whenever an A button (B button for the Xbox players) can do something.
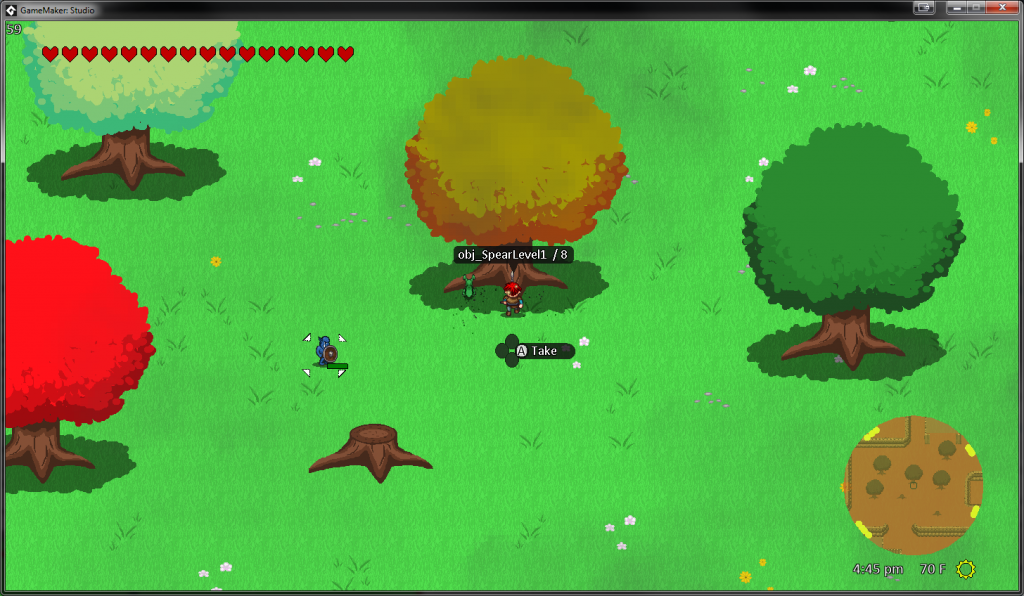
Action Tutorial
For example, in the above screenshot, we can take the weapon obj_SpearLevel1 that does 8 damage. Yes, the naming right now is just the object name, but just imagine it saying “Wooden Spear /8”. Also, the UI has updated for dropped weapons as well.
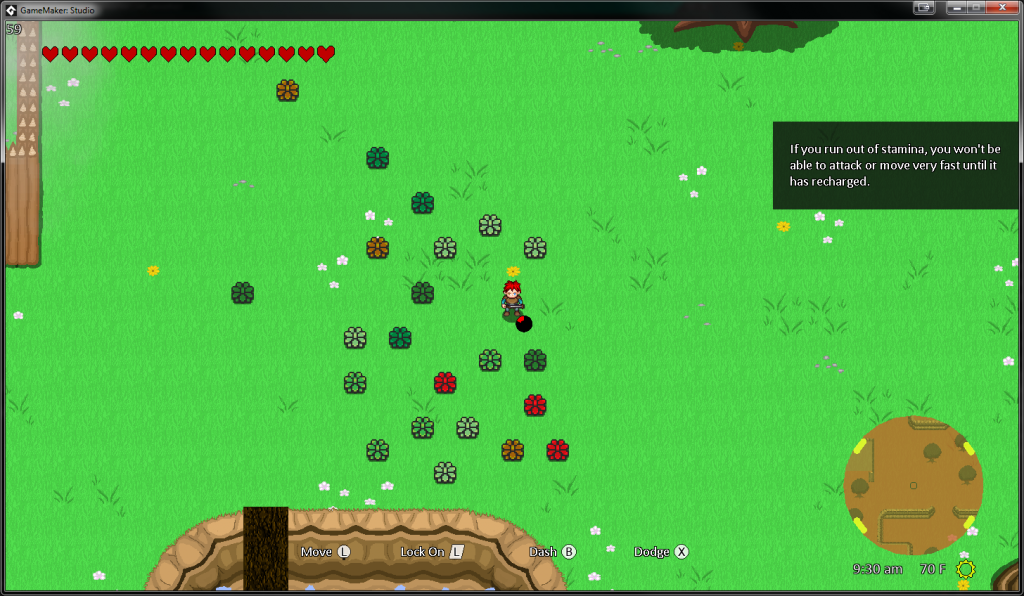
The third type is what we call Tip Tutorial. These types of messages come from the upper right of the screen to display a helpful message to the player, such as the one pictured below:
Tip Tutorial
These of course will only display once and then disappear. No annoying redundant messages here!
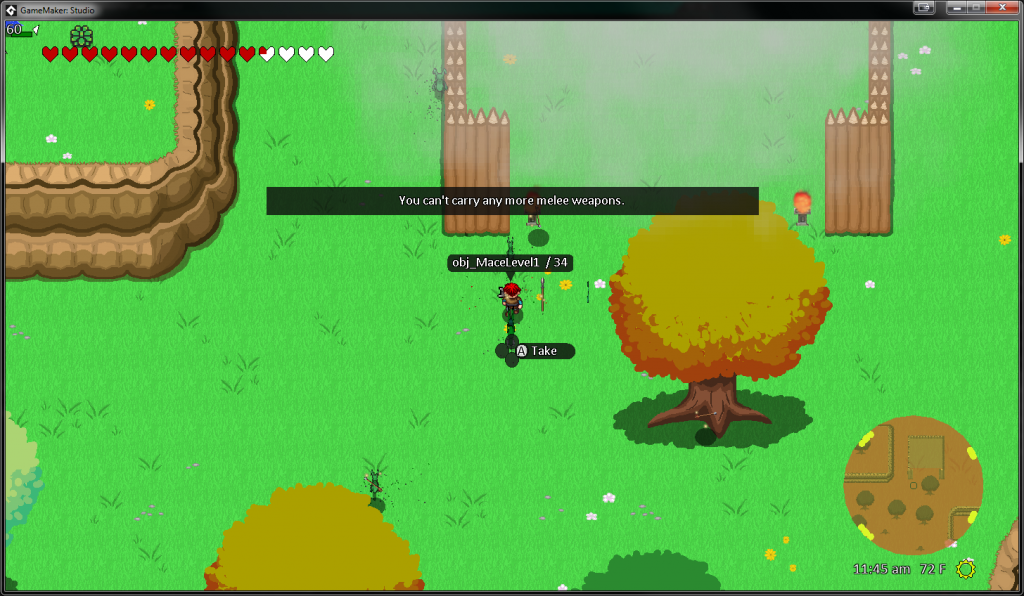
Finally, the last type, which is simply called Alert Message, will show in the upper-middle of the screen whenever something needs attention.
Alert Message
GML Textbox
Since we started doing so much with textboxes, we ended up refactoring the way we are rendering them. With the exception of the NPC textbox, we originally were calling GML‘s draw_text function whenever we needed to draw text. However, we needed a better way for handling text, within a certain width or height. Below we are sharing the code to generate slick textboxes within GML. This code will allow textboxes with a width and height, text shadows, left and right padding, border-radius, a fill color, alphas, and much more. Of course, all of these parameters just mentioned are optional. If we want to use the defaults, simply put -1 for the parameter. We hope another developer stumbles upon this and makes their life easier.
/// @description draw_textbox(xx, yy, str, [anchor, font, alignment, fillAlpha, textAlpha, width, height, radius, paddingLeftRight, lineHeight, fillColor, textColor, shadowColor])
/// @param xx
/// @param yy
/// @param str
/// @param [anchor
/// @param font
/// @param alignment
/// @param fillAlpha
/// @param textAlpha
/// @param width
/// @param height
/// @param radius
/// @param paddingLeftRight
/// @param lineHeight
/// @param fillColor
/// @param textColor
/// @param shadowColor]

var mandatoryParams = 3;
var numParams = 16;
var normalParams = numParams - mandatoryParams;

var prevAlpha = draw_get_alpha();
var prevColor = draw_get_color();

var xx = argument[0];
var yy = argument[1];
var str = argument[2];

var anchor;

var fillAlpha;
var textAlpha;

var font;
var alignment;

var width;
var height;

var radius;
var paddingLeftRight;
var lineHeight;

var fillColor;
var textColor;
var shadowColor;

var args = [];

for (var i=mandatoryParams; i<argument_count; i++)
{
  args[i - mandatoryParams] = argument[i];
}

for (var i=argument_count; i<numParams; i++)
{
  args[i - mandatoryParams] = -1;
}

var autoWidth = false;

for (var i=0; i<normalParams; i++)
{
  switch (i)
  {
    case 0:
      anchor = args[i] == -1 ? fa_center : args[i];
      break;

    case 1:
      font = args[i] == -1 ? font_Standard : args[i];
      draw_set_font(font);
      break;

    case 2:
      alignment = args[i] == -1 ? fa_center : args[i];
      break;

    case 3:
      fillAlpha = args[i] == -1 ? .8 : args[i];
      break;

    case 4:
      textAlpha = args[i] == -1 ? 1 : args[i];
      break;

    case 5:
      if (args[i] == -1)
      {
        autoWidth = true;
        width = string_width(str);
      }
      else
      {
        width = args[i];
      }
      break;

    case 6:
      height = args[i] == -1 ? string_height(str) : args[i];
      break;

    case 7:
      var smaller = min(width, height);
      var larger = max(width, height);

      var ratio = smaller / larger;
      var mag = magnitude(width, height);

      radius = args[i] == -1 ? round(ratio * mag * .5) : round(args[i]);
      break;

    case 8:
      paddingLeftRight = args[i] == -1 ? 0 : args[i];
      break;

    case 9:
      lineHeight = args[i] == -1 ? string_height(str) : args[i];
      break;

    case 10:
      fillColor = args[i] == -1 ? c_modern_black : args[i];
      break;

    case 11:
      textColor = args[i] == -1 ? c_white : args[i];
      break;

    case 12:
      shadowColor = args[i] == -1 ? c_black : args[i];
      break;
  }
}

if (autoWidth)
{
  width += paddingLeftRight;
}

var halfWidth = width * .5;
var halfHeight = height * .5;

var halfPaddingLeftRight = paddingLeftRight * .5;

var startX;
var endX;

switch (anchor)
{
  case fa_left:
    startX = xx;
    endX = xx + width;
    break;

  case fa_center:
    startX = xx - halfWidth;
    endX = xx + halfWidth;
    break;

  case fa_right:
    startX = xx - width;
    endX = xx;
    break;
}

var x1 = startX;
var y1 = yy - halfHeight;

var x2 = endX;
var y2 = yy + halfHeight;

if (fillAlpha != 0)
{
  draw_set_alpha(fillAlpha);
  draw_set_color(fillColor);
  draw_roundrect_ext(x1, y1, x2, y2, radius, radius, false);
}

var textX;

switch (alignment)
{
  case fa_left:
    textX = startX + halfPaddingLeftRight;
    break;

  case fa_center:
    textX = xx;
    break;

  case fa_right:
    textX = endX - halfPaddingLeftRight;
    break;
}

draw_set_halign(alignment);
draw_set_valign(fa_middle);

draw_set_alpha(textAlpha);
draw_set_color(shadowColor);

var hashStr = string_hash_to_newline(str);

var strWidth = width - paddingLeftRight;

draw_text_ext(textX - 1, yy - 1, hashStr, lineHeight, strWidth);
draw_text_ext(textX - 1, yy + 1, hashStr, lineHeight, strWidth);
draw_text_ext(textX + 1, yy - 1, hashStr, lineHeight, strWidth);
draw_text_ext(textX + 1, yy + 1, hashStr, lineHeight, strWidth);

draw_set_alpha(textAlpha);
draw_set_color(textColor);

draw_text_ext(textX, yy, hashStr, lineHeight, strWidth);

//reset
draw_set_color(prevColor);
draw_set_alpha(prevAlpha);
draw_set_font(-1);
draw_set_halign(fa_left);
draw_set_valign(fa_middle);
A few assumptions to be made with the above:
We are using font_Standard as our default font. You may want to change that to be whatever you want as the default font.
width and height are both optional. If no width is supplied, the textbox will grow to be the size of the text width.
When no width is supplied, font alignment will not do anything (since there is nothing to align to).
height is essentially a padding top and padding bottom. If text wraps because of a set width, make sure the height is set appropriately.
Reach out if you need help using!
Beach and Desert Scenery
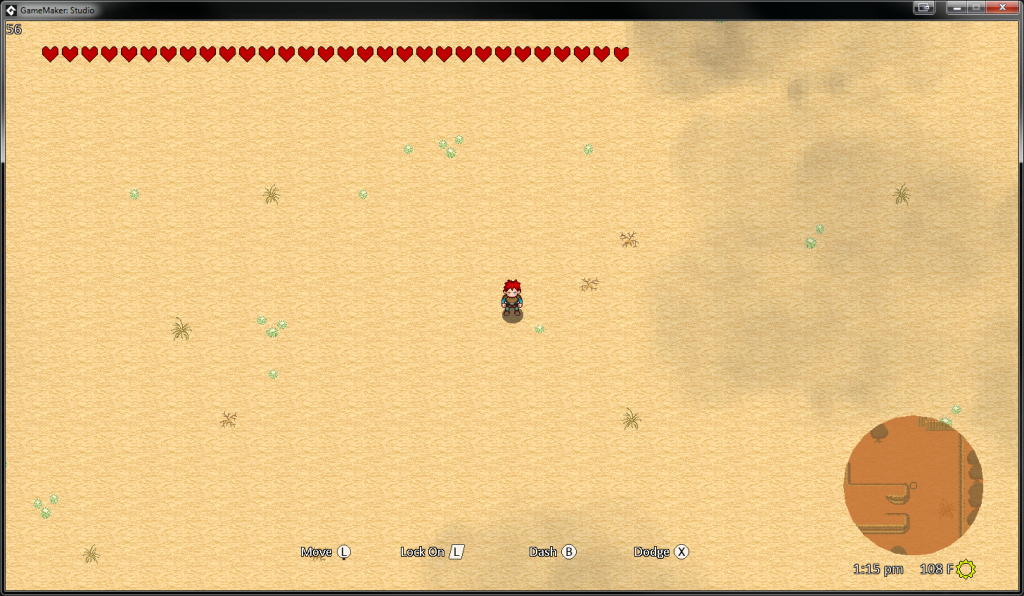
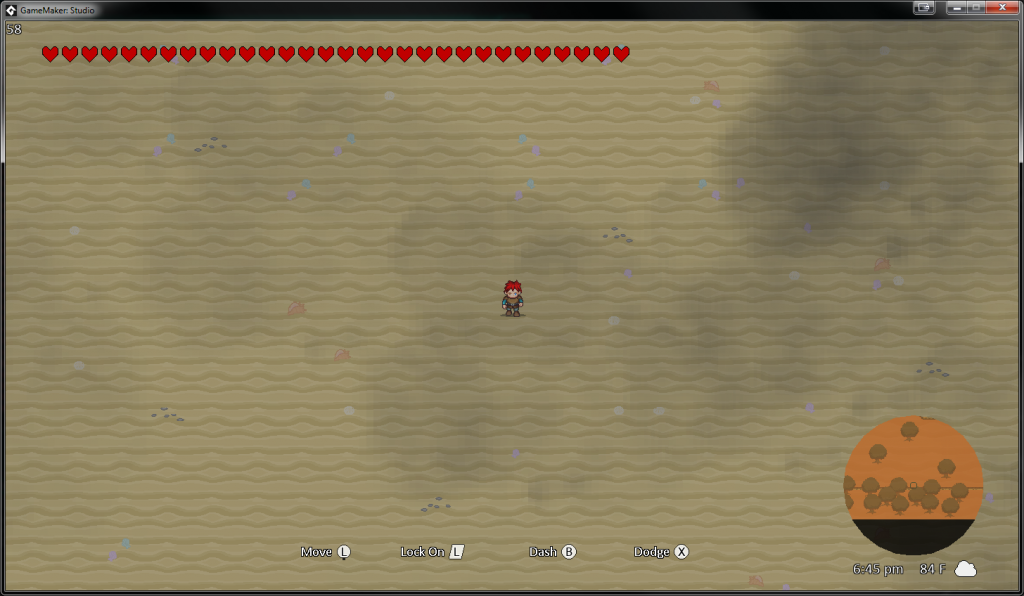
Hannah has been on a role with art lately. Here are a few screenshots of the “vanilla” areas with the tiles she has provided:
The DesertThe Beach (A Storm is on the Horizon)
New Enemy — Ambush
The final feature accomplished this week was a new enemy I am calling Ambush. His behavior is much like the Octorok’s of Legend of Zelda: Breath of the Wild. He hides under brush, and moves around underground. When at the appropriate distance, he will pop up and shoot a rock at the player.
When I was imagining this enemy, I thought “how can I reuse the Knight Ghost?” I ended up refactoring the Knight Ghost into a RandomMovement enemy type that now Knight Ghosts and Ambushes can reuse. We may even refactor Reveels into this enemy type, as they use very similar functionality.
Ambush
Conclusion
That concludes the month of January. I am really beginning to see how all of the pieces are coming together to form a game! I can’t wait to share more!
I have a love-hate relationship with refactoring. On one hand, refactoring is great because we get to clean up code in such a way where (hopefully) the outcome is having a more stable, reusable code base. On the other hand, it is very tedious, time consuming, and mentally exhausting.
For those who don’t know what refactoring is, here is a good analogy from our writer, Julianna:
It’s kind of like shucking corn — programming style. When you shuck corn; you keep what you want (the cob). Then, you can either throw away the husk, or keep it to make tamales. So, for example, the enemy system, you want to keep what you want for other villain characters, and leave what you don’t want with the original characters. Compartmentalizing, basically.
When refactoring, we want to keep the good parts, aka the cob. However, to get to the cob, we have to tear through the husk to get to what we want. Sometimes the husk isn’t all bad though — as we may want to use that for other things.
Imagine shucking corn, but with your brain — and for hours at a time. If you “shuck” the wrong part, the whole system could break. For example, a (new) bug could start occurring from removing the wrong part. This is why I say it is tedious, time consuming, and mentally exhausting!
The reward though is worth the pain. With a stabler foundation, we’re able to create more, faster. There is generally no additional bugs or things to worry about, because the system is running through the same parts, which theoretically should be clean.
So yes, the past week or so has been mostly a refactoring session. There were quite a few TODOs in my code that needed cleaning up before the Leave of Absence. Now that we’ve been adding features at the rate we’ve been, there have been an even more TODOs added that needed attention. The good news is most of these items are now complete, with the exception of a few far off TODOs that are more relevant once we decide how to build a certain feature. The reward? A more polished and functioning game.
What’s New?
There hasn’t been a whole lot “new” added to the game this past week. However, much of what has been posted about in the last few weeks is now more stable and polished. For example, I mentioned that there was Ice Physics when the player walks on ice. But what about the enemies? Shouldn’t they slip on it as well? Well of course! Part of refactoring was taking that code from the Player object and making it reusable for the Enemy object, and others as well. And may I say, fighting enemies on ice while everyone is slipping is a lot of fun!
Looking past the “refactor” commits, one new thing that came through was the three main Soldier enemy types, as well as their color variations. The idea here is very similar to The Legend of Zelda: Breath of the Wild’s enemies. For example, Bokoblin‘s are fairly straight forward, with not too much HP, or very smart. Lizalfos are very fast, and chaotic and behavior. Moblins are slow, but generally strong and a lot of HP. For our game, Orcs are to Bokoblins, Reptiles are to Lizalfos, and Minotaurs are to Moblins. In addition, Reptiles have projectile attacks and can evade attacks, while Moblins can perform a dash attack to knock the player over. We also added color variations as well. For each color variation, the enemy is a little stronger, smarter, and faster.
Enemy Variations
Hannah has also been sending me some additional part for the town and a snowy region. Since I love snow, I thought I would share a quick screenshot of a snow scene (nothing here but the tiles and decor tiles). It will look even more amazing once there are other assets on the screen!
Snow Lands
I want to end this post with a sketch Hannah did of the hero, whose name we will not spoil right now:
Most of the screenshots so far have taken place in the outside “Grasslands”. This past week I have focused more on buildings (houses), NPCs and text boxes!
Houses
Hannah had supplied version one of the houses last week, so I wanted to begin working on a building structure. One idea I wanted to try out with this game is having no loading zones. None. Zero. When the player goes into a dungeon, it will have already been loaded. When the player goes inside a building, it will also have already been loaded. Essentially, the entire map will be one big “room”.
To do this, all buildings and structures will need to be able to be toggled seamlessly when the player enters or exits one of these buildings. From an artistic standpoint, all buildings on the outside and inside need to be the same size. That is what we worked on this past week, and it seems to be working great so far:
HousesInside Left House
The first picture shows the outside of the houses. When the player enters a house (in the above picture, the left house of the first picture), a black surface is drawn over top the parts the player should not be able to see since the walls would be blocking visibility. This feature had already been built when going into and out of forts. However, this week was refined to work better with concepts of being inside and outside. For example, when we in a fort, it is okay for rain to be visible, even though the game considers the player “inside”. Inside an actual house, it would be weird for rain to visible, since there is a roof over top our heads. Now all building structures have a hasRoof property. If a building “has a roof”, we should not let the rain be visible inside the house.
I experimented with the day and night effect as well when being inside a house. Initially I wanted to turn that off the night effect when inside. However, as I was working late one night, I realized that if it weren’t for my lights being on in my office, it would be pitch black. The same now goes for our buildings in the game. If it is dark outside, it will be dark inside. That is why the house pictured above appears to be “on fire”. It’s actually a torch object that gives off light. At night, it makes the house have light.
Mice
Originally, the houses were kind of sad and empty. I decide to make them more sad by adding mice to them:
House of Mice
Since I have a Simple Animal object, I was able to create a Mouse object very quickly. Mice’s movement are very quick and chaotic. When a mouse spots you, unlike other enemies, they will turn the opposite direction and run. If they get cornered, they will do their best to avoid taking damage. But they are just mice after all — they are not the smartest creatures.
Throwing Objects
One feature that was made very quickly a while back was the ability to pick up objects and throw them. This was originally because I wanted to make an enemy type that hid under these objects (and still do). However, there was no collision when the object was thrown and it was limited on two specific objects.
Now, all objects that can be thrown are a child of Interactable. If an object has a pickable property on it, it is allowed to be “picked up”. Enemies, mice, stones, bushes, anything really, can now be picked up and thrown. There is currently a weight variable attached to anything that can be picked up. The heavier the object is, the slower the player is to move with the object. Also, weight contributes to how far the player will throw an object. Heavy objects will not be thrown very far, will lighter objects can be tossed quite a distance.
Carrying a Bush
It may appear that these objects are just on the ground, but that is because we currently do not have proper animation for picking up or throwing. I promise it’s not a Photoshop trick. 😉
Carrying a Mouse
When throwing objects, they will have an arc to them, as if “gravity” was pulling them downwards. If the player is not targeting anything, an object will be thrown in the relative direction the player is facing. If the player is targeting, an object will be thrown in the relative direction of the target.
Objects can now collide with walls and other enemies, taking damage to both. The more weight an object being thrown has, the more damage that will be dealt to both the thrown and the collided. When colliding with solid objects, the object will also “bounce”. To bounce an object, we can simply “mirror” the object’s current direction it’s traveling, represented by:
var direction = 2 * n – v – 180;
Where n is the angle of surface and v is the current direction the object is traveling in. I was stumped for a good hour or so at first because I assumed that n was always 90 (straight line). However, if the object is traveling between 315° and 45°, the surface angle is actually 0 (assuming the wall is a straight line, which we are treating all collisions as straight lines at this point). If the object is traveling between 45° and 135°, the surface angle is 90. etc. For our case, n represents either 0, 90, 180, or 270, depending on the cardinal direction the object is moving. Once I figured that out, we had objects bouncing around beautifully.
Freezing Enemies
Since we now have the ability to pick up things, the player should have the ability to pick up enemies if they are frozen. After breathing “ice” (that’s supposed to sound like “life”) into the ice rod, the projectiles that come out of the rod is now able to be collided with. If an object that can be frozen collides with this projectile, it will take damage and freeze. When frozen, an object cannot move or do anything. There currently is no way to be unfrozen, but that shouldn’t be too hard of a feature to build. However, when frozen, an enemy can now be picked up, which allows us to carry enemies around, and throw enemies at enemies.
Carrying a Frozen Zombie
It’s a lot of fun to carry enemies around and toss them into other enemies! These enemies are pretty heavy, so movement is pretty slow as expected. At some point there will probably be a cap on how much weight a player is allowed to pick up. Perhaps an item will allow the player to pick up heavier objects???
NPCs
The bulk of the work this week has been around NPCs. The first thing that was implemented was movement. Moving a simple NPC was relatively easy since we were able to inherit the behavior of similar objects. However, this worked good for an NPC with no objective, appearing “mindless”. My next task was to build movement for an NPC that could follow a path. I thought this wouldn’t be too hard since the Soldier type enemy already computes, and then follows a path to get to their target. However, I ran into a few hurdles.
For one, Soldier enemy’s paths are from point a to b. Our NPC paths could be that, or they could be circular. A Soldier‘s path also doesn’t have points that repeat, or come near each other. Our NPC paths could do that.
NPCs
Though we are using Game Maker Studio’s (GMS) path creator, I am not using their path manager. This is because I personally think it’s terrible. This is mainly because it updates an object’s x and y positions, as expected. However, it does not update variables like speed. This is rough because we are currently preventing collision into objects (such as walls) by checking if an object’s horizontal and vertical speed components added with an object’s x and y position respectively is inside an object. If GMS simply sets positions, but not speed, objects will not check collisions correctly. This will put unintended objects on top of walls, for example.
The hurdle then was that Soldier and other enemies that use “Dan’s Path Manager” currently keep track of where it is at on a path with this script:
/// @description path_get_rough_position(path) returns a position/point identity based on current x/y location
/// @param path

var path = argument0;

var smallest = 1000000;
var index = -1;

var length = path_get_number(path);

for (var i=0; i<length; i++)
{
  var ptX = path_get_point_x(path, i);
  var ptY = path_get_point_y(path, i);

  var dist = point_distance(x, y, ptX, ptY);

  if (dist < smallest)
  {
    smallest = dist;
    index = i;
  }
}

return index;
The script is actually named path_get_rough_position and was never meant to do much other than return a rough index of where we were at on a path. It essentially compares an object’s x and y position with each point on the path. The script decides that whatever point an object’s x and y position is closer to, that is where “it is at” on the path. If you remember from earlier, an NPC path could cross with itself, or have points that come close to one another. Because of this, an NPC determining where it was at on a path failing because point 2 could be the same or close to point 98.
The solution was actually pretty simple. Sometimes figuring out what the problem is when it comes to programming is half the battle. 🙂 The solution was to manage the NPC’s path index manually (not to be confused with GMS built in path_index variable). Since a Soilder‘s path is usually on average 4 points (thus not being very expensive), is rapidly changing, and from point a to b, it doesn’t make sense to manage the path index. For an NPC though, a path could be hundreds of points, rarely changes, and may not be from point a to b. Because of all of this, it made sense to manage that ourselves.
Managing a path index meant we could do paths like the red line in the screenshot below:
Long Path
Currently the path is very square, but that is because we were simply testing. We can easily do much nicer, “natural” paths.
The NPCs that can follow paths do so on two different timers:
Independent
Global
An independent timer simply means the NPC will move along the path at its own speed. A global timer means the NPC will move along the path at the rate at which the global time of day timer moves. For example, in the above screenshot, the starting point is where the NPC is at near the upper right of the white rectangle. A NPC should complete “one lap” around this entire path in the time it takes for a day/night cycle of the game (approximately six minutes). If for some reason a rock gets in the way because we were throwing it at the NPC, or we were talking to the NPC, or just standing in its way, the NPC will start moving faster on the path to catch up to where it should be on the path. And vice-versa — if the NPC is moving too fast, it will slow down.
Text Boxes
Even though it’s fun to stand in the way of NPCs, or even throw mice and rocks at them, most games have the ability to talk to NPCs. I began work on this feature last night and into late afternoon, with great success. Most games “freeze” game play when talking to NPCs. This is so we don’t get hit by enemies, or miss an event that was supposed to happen. However, I noticed in Breath of the Wild, the environment will continue to “live” — the wind is still blowing, rain is still falling, clouds are still moving, etc. (interestingly, objects like Link and the NPC currently being interacted don’t freeze). I ended up mimicking this idea of the environment staying alive for the most part, with a couple tweaks we will work on later.
Currently text boxes support these features:
Text is pulled in from a language file — so that text is not hard coded and can be adapted for translations.
Text boxes can have multiple pages (think paragraphs you continue on with by pressing a button)
There is currently a typewriter effect. Don’t worry speed runners…
Holding the talk button will make the text go faster.
Pressing the cancel button will make the letters stop typing and immediately show up.
Pressing the talk button once all the letters are on a “page” will begin the next page with the typing effect.
Pressing the cancel button once all the letters are on a “page” will begin the next page with the text immediately there.
Finally, text boxes support a title (like the NPC’s name) and a portrait.
Here is a current screenshot of the concept:
NPC Text Box
Conclusion
Somehow I managed to make this post as long, if not longer than the last one. I am thinking that the next few days are going to be refactor days. We’ve added a lot of new features, but not a lot of clean up has been done, and my brain is starting to twirl. Plus, some thorough testing ought to be done. Either way, I will of course keep you updated!
This title poorly summarizes what I have been working on over the last week. However, the last day or so I have been working on the Ice Rod and ice physics. So naturally this title came to mind. 😀
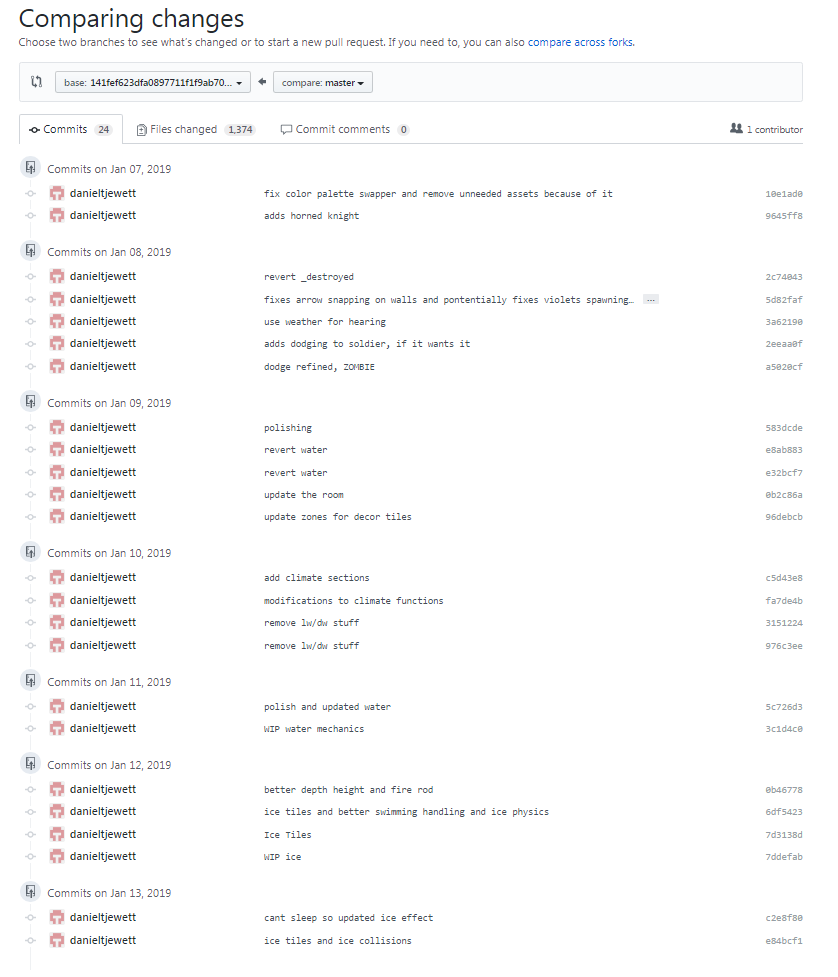
This is one of those instances where it has been great to look back at the past week. I was feeling a little discouraged, as if I had not done much. After looking at a diff between last weeks commit and my latest commit, I realized I had actually done quite a bit. It was a great starting point at looking at what I wanted to write up for this post.
Comparing Commits
Retro Palette Swapper Fix
As I mentioned in a previous post, we will be/are using a palette swapper for sprites. Here’s a quick example of what this means:
The Red Minotaur is currently the original sprite. With the palette swapper, we can simply tell a shader to change the red colors to blue. This makes it nice because we don’t have to recreate a ton of extra sprites for different colors. This saves on file size and time!
However, I ran into a bit of an issue.
For some reason, our friend (or enemy rather) was multi-colored. I spent a little bit debugging, but then ended up reaching out to the owner of the shader/plugin we are using. The support from the owner was amazing. After a few emails back and forth, it ended up being a graphic setting that needed to be toggled in Game Maker (Interpolate Colors Between Pixels). I’ll spare the details of what exactly this does (because it can get really technical), but it basically smooths out the graphics, which we don’t want for pixel art. With this turned on, the shader wasn’t sure if we were talking about red, or a “smoothed” red, and thus, it was not working properly. Turning off the setting fixed the issue and made our pixels look more “pixely” (which is good in our case).
Flying Objects and Shooting Off Cliffs Update
In a previous post, I mentioned that we now have the ability to shoot arrows off of cliffs. I ran into a bug with my quick solution to the problem originally. I ended up resolving with these four things:
Every flying object has a depthHeight which represents how “high” the object is.
Every wall that a flying object that can pass through has an angle at which that object is allowed to pass through. Every wall also has the option to disable collision altogether, if an object’s depthHeight is greater than 0.
If the flying object is passing through a wall between an angle of -90 and +90 of said angle, we increase our depthHeight, and store that wall so we don’t recalculate it. If the flying object is passing through a wall of the opposite angle as stated previously, we decrease our depthHeight and store that wall so we don’t recalculate it.
When a flying object collides with a wall, if our depthHeight is 0, the object stops moving.
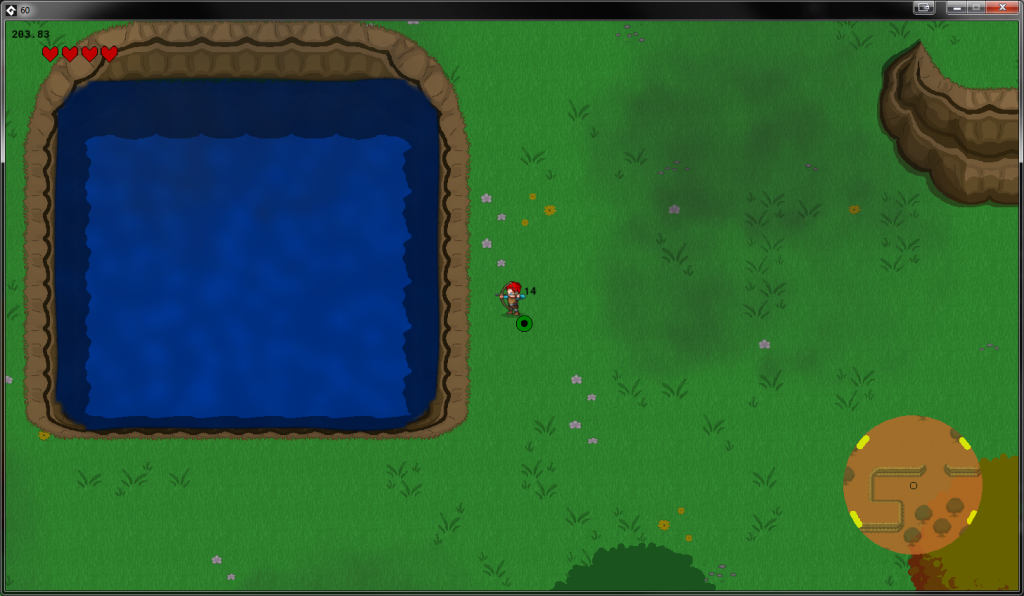
That was sort of technical, but this approach solved the bug. And now, we can shoot arrows, ice, fire, or any other projectile off of cliffs. It also let’s us shoot over a lake correctly, like below:
Shoot Across the Lake
Updated Enemies and AI
We currently added a few more sprites with the Soldier type enemy as mentioned in a previous blog post. I called them Horned Knight (evil knight with a horned helmet), Reptile and Zombies. Zombies have to be the most fun:
The Zombie Apocalypse
When adding the reptile, I wanted the enemy to behave similarly to the Lizafos in The Legend of Zelda: Breath of the Wild, where the enemy can evade your attacks. So, now all soldier enemies have the ability to dodge (if we want to give them that privilege)! It currently works by the following rules:
A property called maxAttempts is set on a Soldier.
Every time the Soldier‘s target’s weapon is swung, increment a swingCount property.
When a timer goes off and the enemy is near the target, randomly, between swingCount and maxAttempts choose to go backwards.
This approach works well when spamming the attack button, the enemy will have more of a chance to dodge your attack. I am not a big fan of the RNG at the moment. This is mainly because the Soldier enemy thus far is very logic driven. This is one of the few things left to chance. Perhaps I’ll come back to updating this when I can think of a better solution.
Climate
I haven’t talked much about the actual game world much. Most screenshots shown thus far are in a demo playground. The world is pretty large though.
Zoooomed Out Map
If you look really closely in the center, there is a small white rectangle. This represents your viewport, or screen. There is not much in this world yet. Even if there was, the detail would be hard to see since we are zoomed out so far away.
What is pictured though is some obvious colored regions. These currently represent climate regions. In the east is the desert, where it is hot during the day and cold during the night. It will rarely precipitate. In the north is the mountain region, where it is brutally cold and storms (blizzards). The lower region of the mountains is cold, but not nearly as many storms. In the south is a beach, where it is hot! Finally, the west region has a swamp in the north west, where it is rainy and mild. The forest is due west, with a mid-west like fall climate. Finally, the southwest, is a jungle, where it is hot and rainy.
I mentioned the big regions, but the climate is actually controlled in two subsections smaller, actually called sections. Though these sections generally follow the above climate patterns, there are a few variations to these. For example, we are envisioning a town in the northern-east most area. This area currently will be cold, but without storms.
I ended up spending a day on this — coming up with the proper percentages (how often it can rain, being cloudy, etc.) and temperature ranges for each area and casually testing these out to make sure they were working properly. These are of course subject to change as the game progresses. 😉
Water (Again)
I decided to play around with water again. This is mainly because I knew I was going to be working on swimming this week. My findings were interesting, as I continued to play with blending modes and masks. I thought it would be important to create large bodies of water in the future. Thus, I decided that water should be created with shapes, and then a texture would be drawn within that area. There was a lot of learning here for me since I am not a GPU drawing wizard. I did manage to learn how to draw sprites/textures onto a masked shape.
With this learning though, the end result will be to scrap this approach. For one, each frame to draw the water, its shape, its ripple effect, its underwater objects, its reflections, etc. is pretty expensive. Even though I could spend hours optimizing and making better, was it really worth it? There have been two rules I have been following when creating something new:
Is it believable?
Is it fun?
Water is one of those things that is hard to make believable, because of its complexity. Though the effects were “fun”, Hannah and I didn’t find them to be believable. I had Hannah sketch up more of a Link to the Past style, which hopefully we can be implementing soon.
Water Sketch
In the end, learning how to draw a sprite/texture onto a mask was a key learning and take away. I am currently masking sprites/textures roughly in a few places (for example, the mini-map in the lower right hand side of the screen). But with this new learning, this functionality can be cleaned up and reused throughout the game.
Swimming
If there is water, then there must be swimming. Swimming is an interesting mechanic because to make it believable, most games will reduce the speed of movement, as well as eliminate attacks altogether. Personally, I dislike parts of games that make me swim, because I don’t like having my movement constrained.
Swimming
The current implementation we went for is to be believable, and all movement is a third of what the hero can do on land. However, we do allow the player to attack — but again, at a third of the movement. This allows for some interesting combat in the water. My end goal though is to think of a clever way to make a believable water scenario where movement feels slick. Worst case scenario, we will design the game around spending less time in water, for those like me who dislike the slow movement.
If we can jump into water from a cliff, we need the ability to get out of water with some kind of “dock” mechanic. In the screenshot above, we have added docks to the lake. When colliding with the dock on the edge, it makes the player “jump” out of the water. It’s currently the same mechanic and animation used to jump off of cliffs. In a future polish update, we can change that around to look more like the character is getting out of the water.
Finally, ICE
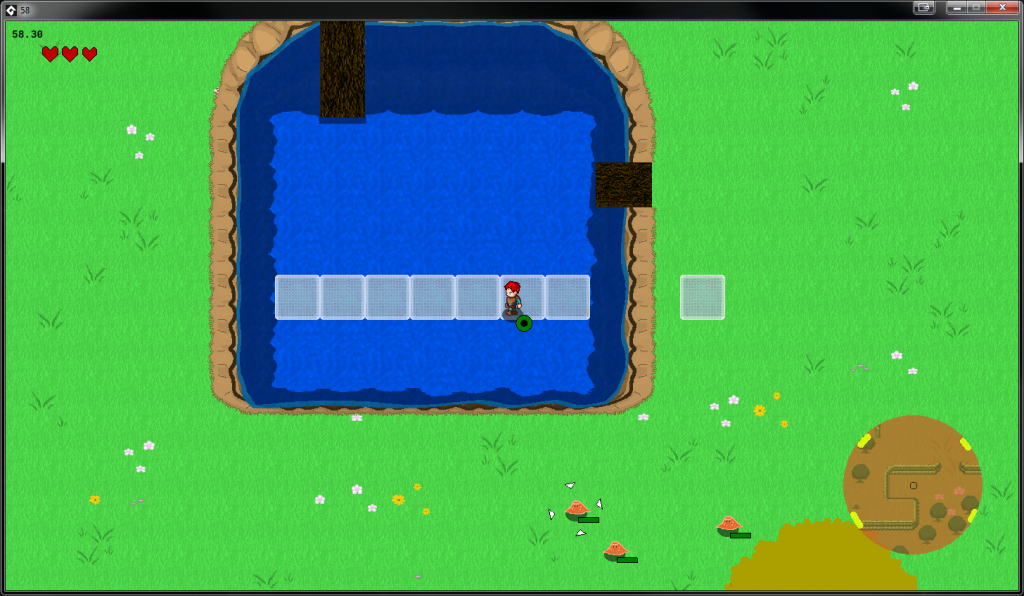
Ice currently has some interesting behavior. My goal with fire, ice, and water is to develop a Rock-paper-scissors concept, where fire beats ice, ice beats water, and water beats fire. Currently fire is used with the Fire Rod, torches, and enemy’s that breathe fire. Water is currently developed where there are natural bodies of water and rain.
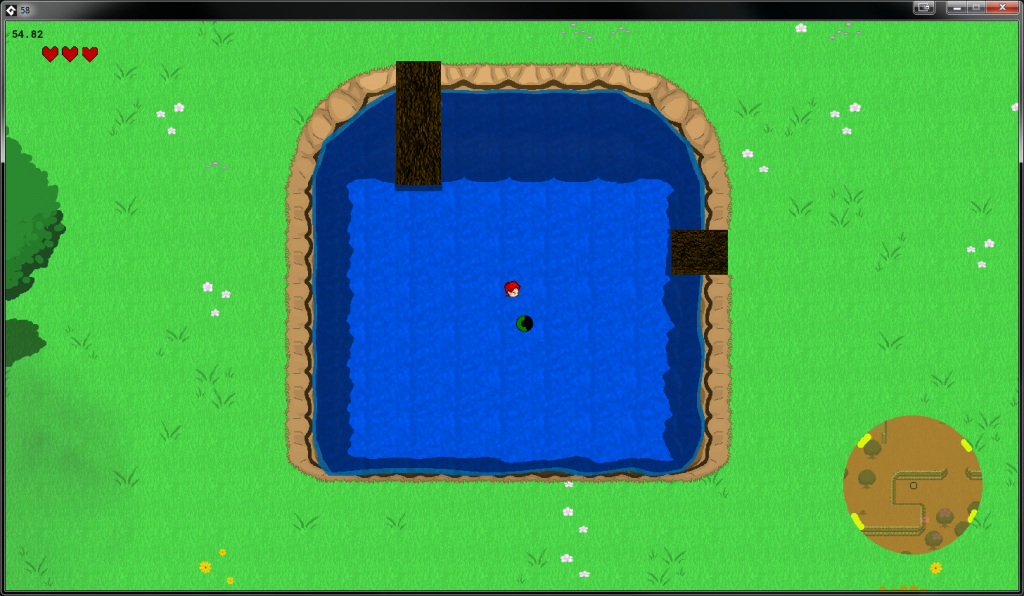
Where ice is “nice” is when it interacts with water, because ice beats water. Whenever the Ice Rod is shot near water, it creates Ice Blocks which the player can walk on.
Ice Rod Shot Over Water
Since it is ice we are walking on, there of course is ice physics that makes the player feel like they are on ice. Originally we had this less slippery, but most of the feedback I received so far was to make it more slippery. We’ll continue to tweak the values so that it feels believable, but not annoying. We aren’t creating an ice simulator, after all.
Since fire (heat) beats ice, ice currently melts during game play. I have an interesting formula I would like to share. I call it Ice Melting Rate:
var rate = ((logn(62, temp + 30) - 1) / 200)
The inputs are a temperature. Temperatures are based in Fahrenheit. Currently the lowest temp in the game world is -22°F. We add 30 to the temperature always because the logarithmic function cannot accept zero or negative values. We then use a base 62 logarithmic function. Let’s say our temperature is 32, which is freezing. When we add 30 to that number, we get 62. I wanted freezing point to always return 1. Thus, log base 62 of 62 would yield 1. Numbers that are less than one will actually freeze the ice tile faster, while numbers above 1 will melt the ice, but not at the same rate as freezing. We subtract 1 from the output of the logarithmic function because in the game, rate being a negative number will increase the melting timer (we subtract from rate and if rate is a negative number, we’re really adding). Finally, the constant 200 seemed to be a good number that gave us good rate at which every frame of the game the ice melts.
In practical terms, when ice is around 40°F, it will take 56 seconds for the ice to melt, where as ice around 70°F will take 14 seconds to melt. In game terms, if the player is standing on ice above water, and the temperature is warm, the player better hurry to create more ice, or they will fall through into the water!
Conclusion
After writing this, I realize that there was definitely a lot accomplished! I think moving forward, it will probably be best to write blog posts every couple days with the feature that was being worked on, instead of a week’s worth of features.
All that to say, a lot of progress has been made this past week, and I cannot wait to share the next set of features!
Over the past few weeks I’ve been trying to figure out how I can accomplish making a game on my own. There is a lot that goes into creating a game. When you consider art, programming, music, and all the other details, it can become overwhelming. I decided it was in the best interest of the game to begin looking for individuals who could help contribute on this unique journey with me. Today was an especially exciting day as it was the first time “the team” could all get together and meet each other, share ideas, play some games (Super Smash Brothers Ultimate anyone?) and simply have fun.
It was amazing to see and hear all the new ideas. We first were able to share feedback of the creation, the Centaur. The team concluded that though some animation was needed for the anticipation frames, it was challenging and fun to play. We also talked updated story ideas, and let me tell you — the updated story plot completely “floored” me — this is going to be good stuff! Next we listened to a few music samples for the game. Though I am a hard rock guy myself, I was digging the “Accordion Song” with a Cave Story, Mimiga Town vibe to it. We finally checked out some amazing concept art from old and new ideas alike.
One of the plans for the day was to play through The Legend of Zelda: A Link to the Past. To my surprise, no one on the team had ever played this amazing game (seriously though, if you haven’t played, do yourself a favor and play it!). After booting up my Wii U, I realized I no longer owned a Classic Controller for the Wii Virtual Console because I owned GameCube controllers, which worked on the Wii, but not on the Wii U. So, I ran over to my parents to pick up the legend. 🙂
I personally haven’t played through the game in a while, and it was great to hear criticism of a game from first time players that sometimes I can be blinded by nostalgia. My most interesting discussion take away was how a games’ difficulty wasn’t necessarily due to well programmed AI, but rather dropping in a ton of enemies who’s objective was to simply move in your direction. It is easy in 2019 to be critical of this attack pattern when games that ran on the SNES and similar hardware during that time couldn’t be computing real time paths for hundreds of enemies — so they made due with simple and fast. Looking back though, this can be frustrating for a player to feel “ambushed” — especially when the method of an enemy’s attack is simply to run into you.
Anyway, I digress. The original reason for this post is to introduce and praise on my team. So without further ado:
Hannah Boellner – Artist
Hannah’s been actually helping with art back in May or June of last year. A couple friends of mine had mentioned how talented of an artist she is. After “Facebook Stalking” a few of Hannah’s artwork, I decided to ask her if she would be interested in the project. Though she hadn’t done pixel art before, she was willing to try. She first started with some concept art of the Violet. After I was completely impressed with her skill, we decided to try doing a tree in pixel art. After a few rounds, we nailed down the style and since has continued to impress me day after day with amazing and awesome art. The thing that impresses me most about Hannah is how she is willing to give anything a try, with 110% effort. I want to conclude by admittedly waiting WAY too long to publicly give her credit, where credit is rightfully due. Without Hannah, we would not be as far along as we are today.
Tyler Shipley – Composer
In my early twenties, I started really getting into composing with FL Studio with some pretty solid tracks. However, compared to the musical genius mind of Tyler, it pales in comparison. I’ve actually got to know Tyler pretty well in the last couple months. We both have a love for really good video game music and love listening to it on a regular basis. Of course, I am listening to metal remixes while Tyler is listening to more relax, ambient soundtracks. But this contrast is great as we both share thoughts and ideas to make each other better (though, frankly, I just inputting notes into FL Studio while Tyler is flawlessly composing and playing on his digital keyboard). I feel like we’re scratching the surface of what Tyler is capable of. So, watch out world — we have an upcoming David Wise on the horizon!
In my first post, I mentioned that I would be taking a leave of absence from Root. Well, this past week was the official start of that journey. I’ve been getting into the routine and have made some good progress. This past week has been about adding a few more enemy types.
The main current enemy type so far has been a Soldier type enemy. This enemy type, without getting too nerdy, uses logic to find the best path to the target (in most cases, the hero). It uses the A* algorithm to compute a path, and some “magic” to not feel so stiff. This enemy has been great, and can even wield single-handed sword and/or shield combo, single-handed spear, two-handed big weapon, and a bow and arrow.
I wanted to add some more unique enemies that are a ton of fun, but much less “smart”, thus being quicker to develop and less CPU intensive because it is not trying to “compute a path” in real time.
The first I named Reveel:
Reveel (graphic credit to Nintendo)
I wanted an enemy type that could “reveal” — appearing and disappearing, much how the Leever works in the original Legend of Zelda game. Now that the codebase is there, and I can essentially replace this graphic with my own art. We can add other types of Reveel objects too by creating a child object of the Reveel object.
Next is a Centipede type enemy:
Centipede
If you have ever played any of the Snake games, the movement of this enemy is very similar to that. The idea here is every time we deal enough damage to the Centipede, it will lose a piece, until there is nothing left. This guy isn’t fully built, but enough of him is there to take a screenshot. 😀
This guy has quite the story. As I mentioned, I wanted some less “smart” enemies. Originally, the Minotaur was that. But as I began playing against him, he was just too stupid for the attacks I gave him. I originally gave him a dash attack and a projectile (fire ball) attack. Though the attacks worked well, his movement and lack of being smart was weird. I moved on because I wanted to make the ultimate baddie…
Anyone who’s played the Legend of Zelda: Breath of the Wild knows that the Lynel is one of the meaner enemies in the game. However, Nintendo didn’t just make the Lynel tough to be cruel. They created the Lynel to feel a sense of accomplishment when beating it, as well as getting a ton of loot from what they drop when defeated. I wanted to create an enemy type that was just as tough and rewarding.
I thought about creating a brand new enemy type. However, after thinking for a while, I decided to merge the above Minotaur enemy with the Soldier enemy. I took what was good with the Minotaur, the attack patterns, and added the path finding ability of the Solider, and got and even more robust Soldier enemy. Soldiers can now wield weaponry that was already mentioned and also can perform dash and projectiles attacks as well. The best part is if I wanted to update the current Solider enemies with these new attacks, it is as simple as adding graphics for them.
It’s pretty cool to see something like the original roughly developed Minotaur become an awesome dynamic enemy by taking a few concepts and merging them together!
I wanted to post a few screenshots of some smaller items I have been working on the last month. First, fire:
Fire
Currently the only way to create fire is using a “fire rod”. Fire cast from a fire rod has a uncontained property, meaning that it can burn things that are burnable, such as brush, trees and stumps. Fire can spread and catch other burnable objects on fire too! If set in the right spot, it could cause a forest fire effect. Fire that is contained (such as in torches) cannot spread. However, an idea to be built upon is taking an arrow, lighting the tip with fire, and now the arrow has fire that is contained to the arrow, but shot at a burnable object could catch it on fire as well. Finally, when it rains, fire will be put out.
Next, water:
Water (https://marketplace.yoyogames.com/assets/6081/realistic-water-reflection)
I spent WAY too much time goofing around with shaders, blend modes and other nonsense. Unfortunately, this is all I have to show for it. But at least I learned a little bit — I think. 🙂 Water currently has a ripple around the edges, and reflection with objects that are underneath and above. I currently want to optimize this, because the current approach is pretty expensive. I also want to put a “shallow end effect” near the edges of the water, basically coloring the graphic with a lighter shade of blue.
Oh! This screenshot reminded me, we can also shoot arrows off cliffs. For example, shooting the arrow would go across the pond here. Before, it would collide immediately into the edge of the cliff, because it is considered a wall object.
Honestly, this little guy is just a placeholder for an enemy I’ve been working on. But it did get me thinking — I need to add animals that roam around eventually. I started creating an Animal object that all Animal’s will inherit from (I just realized I have gone full circle in my programming career now).
Also in this screenshot, you’ll notice the tree is colored differently. We are now able to do a color palette swap. This will keep the file size down by not having to recreate a ton of art with different colors, and of course, save time 🙂